Hives & Equipment
How to Choose and Use a Bee Smoker
Learn how to choose the right bee smoker, light it so it stays lit, and use it safely at the hive for calmer inspections.
Smoke is one of the oldest tools in beekeeping, and the science behind it is straightforward: it masks the alarm pheromone bees release when they feel threatened, buying you a calmer window to work the hive. A smoker that stays lit for a full inspection is half the battle. A smoker that dies out three frames in leaves you fumbling while the colony's mood shifts.
Here is what you need to know to pick the right smoker, fuel it well, light it properly, and use it with confidence at the hive.
How Smoke Actually Works on Bees
When a guard bee stings or senses danger, it releases isoamyl acetate, a chemical that smells faintly of bananas and signals other bees to defend the hive. Smoke interferes with that signal in two ways. First, the particles in the smoke physically disrupt the bees' ability to detect the pheromone. Second, the bees instinctively respond to smoke as a threat of fire, triggering a feeding response where they gorge on honey in anticipation of having to relocate the colony. A bee with a full crop is physically less able to sting, and a colony focused on eating is less focused on you.
None of this means bees become docile or oblivious. They still know something is happening. Smoke reduces the intensity of their defensive response, giving you a working margin. Oversmoke a hive and you'll stress them unnecessarily; use too little and the guard bees will recruit defenders faster than you can work.
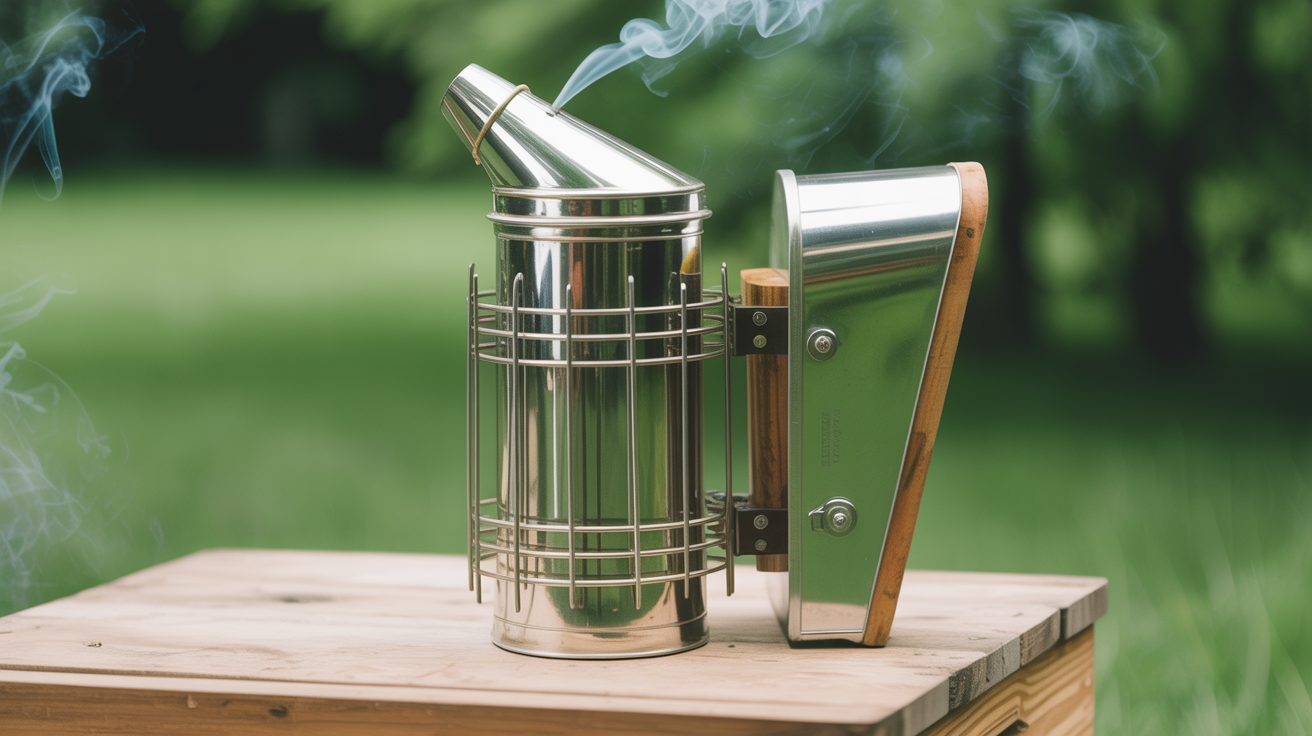
Choosing a Smoker
Smokers come in a few sizes, and the difference matters more than most beginners expect.
Size
A small smoker (roughly 3 by 7 inches) is fine for checking a single nucleus colony or a hobbyist with one hive. For anything larger, a 4 by 10-inch model is worth the price. A bigger chamber holds more fuel, which means it burns longer and you spend less time relighting mid-inspection. If you're managing multiple hives in a single session, this is not optional.
Heat Shield
Look for a smoker with a metal cage or wire guard around the chamber. The barrel gets hot enough to burn skin and scorch wood, and a heat shield lets you set it down on a hive box without worry. Some cheaper models omit this. Skip those.
Bellows Quality
The bellows is the part that most often fails first. Thick leather bellows outlast thin ones significantly. Squeeze the bellows in the store: it should feel substantial and spring back quickly. Soft, floppy bellows require more pumps to move enough air, which gets tiring during a long inspection. A solid metal hook to hang the smoker from a hive box is a small feature worth having.
Brands like Mann Lake, Goodland Bee Supply, and Brushy Mountain make reliable smokers in the $30 to $60 range. You do not need to spend more than that.
Good Fuels vs. Fuels to Avoid
The fuel determines whether your smoker produces cool, white smoke (what you want) or hot, acrid smoke that agitates bees instead of calming them.
Good fuels:
- Dried pine needles (widely available, burn slowly, produce cool white smoke)
- Natural burlap (coffee sacks work well; cut into strips)
- Wood pellets designed for smokers or food-grade pellet grills
- Untreated wood shavings from a lumber yard or pet store (rabbit bedding works)
- Dried sumac seed heads or dried leaves from non-toxic plants
- Cotton from old cotton rags or denim (natural fibers only)
Fuels to avoid:
- Treated or painted wood (releases toxic compounds)
- Cardboard with dye or glossy coating
- Synthetic materials of any kind
- Anything that smells strongly of chemicals or burns orange instead of white
- Hay that is too green or damp (produces heat without smoke)
Damp fuel is the main reason smokers go out. Store your fuel dry. If you live somewhere humid, keep it in a sealed container.
Lighting a Smoker So It Stays Lit
This is where most beginners struggle. The method below works consistently.
- Start with tinder. Crumple a small piece of newspaper or a dried leaf into the bottom of the chamber. Light it and let it catch fully before adding anything else.
- Add a small handful of fuel. Don't pack it in. Drop it loosely over the flame and pump the bellows gently, about once per second, until the fuel catches and you see white smoke rising.
- Add more fuel in layers. Once the first layer is burning, add another small handful. Pump again. Wait for it to catch. Repeat until the chamber is about two-thirds full.
- Pack the top lightly. A loose layer on top slows the burn without smothering it. If you pack too tight, you'll cut off airflow and the fire will die.
- Test before you approach the hive. Pump the bellows firmly. The smoke coming out should be white or pale gray and noticeably cool. Hold your hand a few inches from the nozzle: you should feel airflow but not heat. If you see sparks or feel warmth, the fire is too hot and too near the nozzle.
Keep the smoker upright while you work. Laying it on its side smothers the fire. If it starts to sputter during an inspection, a few firm pumps of the bellows will usually bring it back.
Using Smoke at the Hive
Less is more. New beekeepers tend to over-smoke because they're nervous, and over-smoking can leave the colony unsettled for hours afterward.
At the Entrance
Give two or three puffs of smoke at the hive entrance before you do anything else. Wait 30 to 60 seconds. This gives the smoke time to filter through the colony and begin masking the alarm signal. Don't rush this step.
Under the Cover
Before lifting the outer cover, puff two or three times under the inner cover or along the gap where you'll be breaking the propolis seal. Let the bees move down and away from the top bars before you lift. Trying to pry up frames with bees densely packed at the top is how gloves get tested.
During the Inspection
Smoke sparingly as you work. A puff or two across the top bars when bees start to cluster densely near your hands is usually enough. If you hear the colony's pitch shift from a low hum to a higher, more urgent tone, a couple of puffs across the frames will settle them. That pitch change is a useful signal to pay attention to.
Keep the smoker nozzle pointed at the bees, not at any open cells where you might drive smoke directly into capped brood or stored honey.
Keeping the Smoker Going
A well-packed smoker should stay lit for 45 minutes to an hour without attention. If yours keeps going out, the most common causes are:
- Fuel that's too damp
- The chamber packed too tightly (no airflow)
- Tinder that didn't fully catch before fuel was added
- The smoker sitting idle for too long without being pumped
Give it a few pumps every five to ten minutes even when you don't need smoke at that moment. This keeps the fire alive without generating a lot of smoke.
Putting It Out Safely
A smoker that looks cold can have live embers inside for an hour or more. Don't set it down somewhere flammable and walk away.
Fire safety note: Never leave a lit or recently lit smoker unattended near dry grass, wood, or other combustibles. Keep a small bucket of water nearby when you're working, particularly in dry conditions.
To extinguish the smoker, plug the nozzle with a cork or stuff a handful of green grass into it to cut off oxygen. Some beekeepers drop the whole smoker into a metal bucket until the fire starves. A dedicated smoker snuffer (a small metal cap that fits the nozzle) is cheap and convenient. Once it's cool to the touch, empty the ash before storage. Residue buildup inside the chamber will eventually corrode it and reduce airflow.
Bringing It Together
A good smoker setup for most backyard beekeepers looks like this: a medium or large smoker with a heat shield, a bag of dry pine needles or wood shavings as primary fuel, newspaper for starting, and a cork or snuffer for extinguishing. Total cost is modest, and the habit of lighting the smoker before suiting up becomes second nature within a few inspections.
If you're still figuring out which hive type you're working with, the guide on choosing your first hive covers how the different designs affect how you'll approach inspections. For questions about box configuration once you're up and running, deeps vs. mediums walks through the tradeoffs. And if you're still assembling your gear, the beekeeping starter kit covers what's worth buying early.
Frequently Asked Questions
Why does my smoker keep going out?
Usually one of three things: the fuel is damp, the chamber is packed too tightly and airflow is restricted, or the initial tinder didn't fully catch before more fuel was added. Try starting with a fully lit piece of newspaper, then adding fuel in small layers rather than all at once. Let each layer catch before adding more.
What is the best fuel for a bee smoker?
Dried pine needles are a consistent favorite among experienced beekeepers. They're easy to collect and store, burn slowly, and produce cool white smoke. Natural burlap is a close second. Wood pellets work well if you want something consistent and sold in bulk. Avoid anything treated, synthetic, or with strong chemical odors.
Is smoke harmful to bees?
Used correctly, no. Occasional moderate use during inspections does not harm a healthy colony. Chronic heavy smoking, or using fuel that produces toxic smoke, is a different matter. The bees' instinct to gorge on honey when exposed to smoke is a natural behavior, not a stress response they can't recover from. Let the colony settle for a few hours after an inspection before checking again.
Can you inspect a hive without a smoker?
Yes, and some experienced beekeepers prefer to on calm, warm days with gentle colonies. A few drops of water or a light spray from a mister can help. But for beginners, for aggressive colonies, or for inspections longer than a few minutes, a working smoker is the sensible choice. It gives you a margin for error that matters when you're still learning how to move slowly and read the frames.
How do you put out a bee smoker?
Plug the nozzle with a cork or stuff it with green grass to starve the fire of oxygen. Some beekeepers use a dedicated metal snuffer cap. Set the smoker on a non-flammable surface and leave it until it's completely cool to the touch before storing it. Never leave it unattended near dry vegetation or wooden structures while there are still embers inside.